Rebekah Simmers
Author
Journey to Metzlingen: “Adventures in German Cooking” Part Four – Pretzels

I recently had an email from a reader asking about providing “Questions for Book Clubs” for my novel “The King’s Sword”, which led to a fun conversation with some writing friends. Not only did we discuss creating a series of thoughtful questions (which I’m putting together and will post soon), but my friends also recommended creating some fun things to go along with it. One fun idea was the “Adventures in German Cooking” event, which the kids and I completed over the weekend. This is the last post in that series, focusing on the pretzels 🙂
Those Pretzels though . . .
German bakeries are amazing. Or I should say, any bakery is usually pretty special. You walk in and your senses light up. You’re hit with a mix of warm smells. Treated to a myriad of treats behind a pane of glass. Baskets full of candies, cakes, and fun creations. Various shapes and sizes and flavors, all giving you a glimpse into the local tastes, surrounding culture, and personality and talents of the busy bakers. Our family loves pretzels and generally, all kinds of them. Sourdough. Dark. Crunchy. Thin. Thick. Salted. Flavored. Soft. When we first moved to Germany, pretzels were an easy thing to grab basically anywhere for the kids. An easy connection to something familiar and something that simply makes you happy, right?
In a German bakery, you’ll see all sorts of pretzels or Brezeln. Traditional / Bavarian ones. Ones sliced with a smear of butter in between, or perhaps some cheese and chives, or sometimes even a sweet pudding. Others topped with pumpkin seeds, poppy seeds, or cheese. There’s no shortage of pretzels, just as there’s no shortage of recipes for them online. We tried two different ones this weekend, and while they were both good, the second recipe was the hands down favorite for the kids. We made a “Regular” version and a “Gluten-Free” version, simply switching out the type of flour for each, so if you’re going to make both like us, remember to keep your area clean as not to cross-contaminate. These recipes were both hodge-podges of several that we looked at online, again switching things up to suit what we had available to us, for allergies, and what we thought the kids would like. Here is our “Simmers approved” recipe:
Bavarian Beer Pretzels
Step One: Ingredients
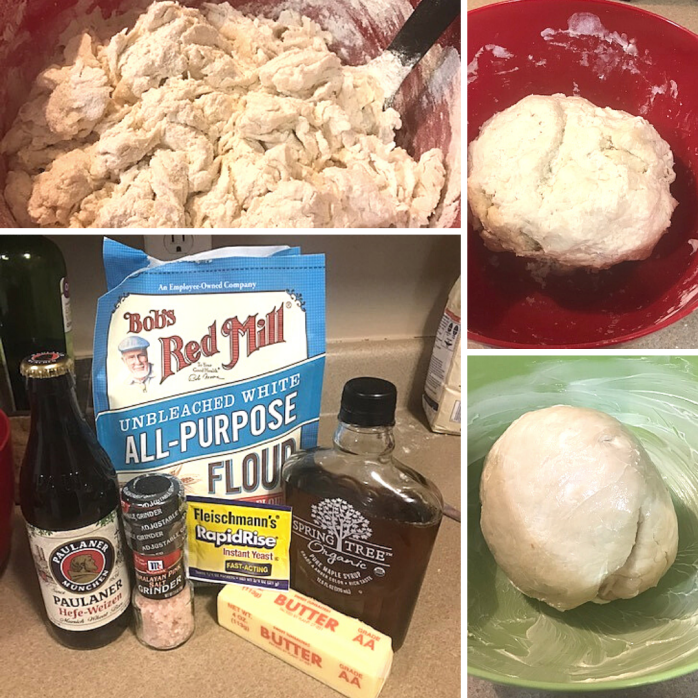
- 3/4 Cup Warm Water
- 1 envelope (1/4 oz) of Active Dry Yeast (NOT fast rising – I had originally bought that and then thought better of it)
- 2 tablespoons Maple Syrup (we used pure)
- 4 3/4 cups unbleached All-Purpose Flour
- 1 cup German beer (Note: for the Gluten-Free dough, I did NOT use beer. Instead, I added buttermilk as I read it would act as a good binder.)
- 3 tablespoons cubed Butter at room temperature
- 1 tablespoon Salt (we got a salt grinder that allowed for us to make it both fine and larger kernels later)
- Extra butter for coating your bowls
- 1/3 cup Baking Soda
- 1 large egg
- 1 tablespoon milk
- 6 cups water
Step Two: Prepping the Dough
Combine the warm water, yeast, and maple syrup in a bowl and stir until dissolved. Let mixture stand for at least five minutes. Add flour, beer, butter, and salt; mix with a wooden spoon until a dough forms. In the top left picture, you can see that the dough is formed, but kind of shaggy – that’s ok. Now the fun begins . . . it’s time to knead that dough. You want the dough to be firm and tacky, but NOT sticky. If the dough is too dry, add water a teaspoon at a time. If the dough is too tacky, add in a tablespoon of flour at a time. Keep working the dough until it’s nice and smooth, like the dough in the red bowl.
Next, sprinkle some flour on your workspace and start kneading the dough. Add in more sprinkles of flour when needed, because you are going to be kneading that dough until it is smooth, elastic, and it’s been at least five minutes. Butter the inside of a fresh bowl, butter your dough, place it inside the bowl, and cover. Let the dough rise in the refrigerator anywhere for at least 8 hours or until it has doubled in size.
Note – you can see the difference in the Gluten – Free dough below. It still worked really well. In retrospect, based off of what happened when we tried to roll it, I would add an extra bit of Xanthan gum to try and get Evie’s dough to hold together once in the pretzel shape better. It still worked fabulously for rolls, but they broke apart too easily when we tried to roll them.

Step Three: The Baking Soda
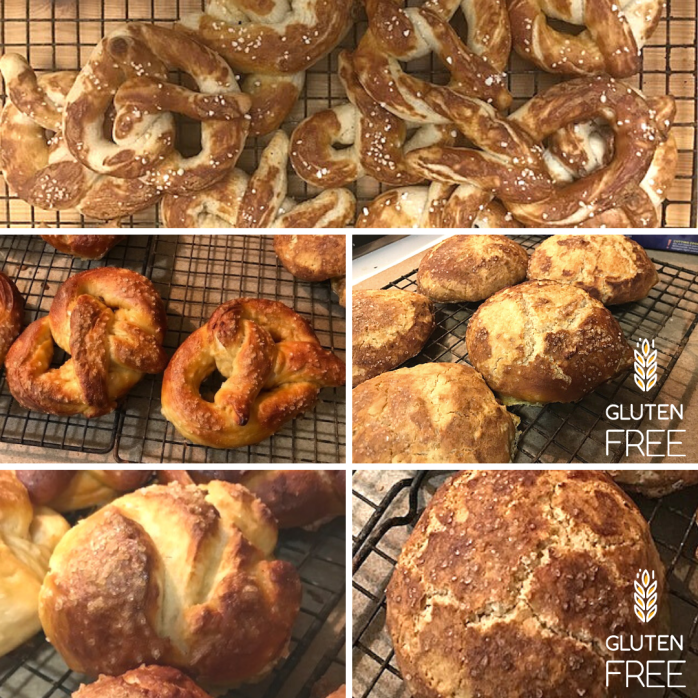
In the round of Pretzels that we made the first evening, I had a small package of Food Grade Lye that I simply combined with water and brushed over the pretzels. It worked great – they got that lovely color, had great texture and taste, and it was really easy to do. For this round though, we tried another method using “Baked Baking Soda”. You can see the comparison in the browning / crusts in a later photo. I’ll be honest – it was more work with this second method, but overall, I think it built a better pretzel.
At the tail end of your dough’s rise time, spread the baking soda into a glass pie dish. Place in an oven preheated to 300 degrees F and bake for 1 hour. Carefully remove when finished, let cool, and store in an airtight container if you aren’t ready to use it right away.

Step Four: Rolling your Pretzels
On a clean (NOT floured) work surface, bring out your dough. Push dough down to deflate. Cut off a small section at a time and work into long strips of dough. If you have any trouble, put a few droplets of water on the surface and it will make it easier to roll your dough. How you make them is up to you – thinner, thicker, traditional shape, random, etc. We just went for fun. The kids enjoyed making the traditional shapes, as well as little pretzel bites. Evie’s dough was a bit harder to work with, so we decided to make her rolls for the most part. Place your pretzels onto a parchment paper lined cookie sheet and set aside again to rise for another 45 minutes.
Step Five: Dipping and Baking
Now like I said on the previous day, I used Food Grade Lye that I simply wiped on the dough at this point, sprinkled with salt, and then tossed them in the oven. They turned really nice and the kids loved them. You can see those on the top of this picture and how they got that nice pretzel brown. The bottom pretzels were the ones that I dipped into the baking soda solution. Much more work, but the crusts were crispier, darker, and just tastier. The insides also remained nice and soft. Just a good pretzel all around.
This is where I definitely took over from the kids. While the oven was preheating to 500 degrees F, with the racks in the upper and lower third of the oven, I made the egg wash (scramble the egg with the bit of milk) and set it aside. Next, I combined the baking soda and tap water in a non-reactive stainless-steel pan. With range fan on high and the window opened for draft, I simmered the mixture, stirring it until the baking soda was dissolved. Using a large, slotted spoon, I placed each pretzel into the mixture for a total of twenty seconds, ten on each side. Make sure to drip off the excess alkaline water and place the pretzels an inch apart onto a clean parchment paper covered cookie sheet. If needed, you can reshape them, but it’s recommended to wear gloves to do so. Quickly brush the pretzels with the egg wash and top with salt (we used the largest size on the grinder and the kernels were a nice size).

Immediately bake your pretzels for about 9 minutes or until they turn that beautiful brown color. We also rotated and spinned the pans halfway through the cooking time as well, to make sure that they evenly baked. Once finished, transfer the pretzels to a wire rack to cool. Get ready to ENJOY!
Thank you so much for joining us on our “Adventures in German Cooking” weekend event. It really was a LOT of work, but it was so much fun. Even the cats were interested, trying to figure out what in the world we were up to 😉 It was really nostalgic for our kids of our time living in Stuttgart (“Mom, it smells like a real bakery in here!” and “Mom, it tastes like Germany!”) and they really enjoyed helping out. And eating everything, of course 😉 Hope you enjoyed the posts and the recipes! Let me know if you end up trying anything. Pretty sure we’ll be making another batch of pretzels soon – I’m going to need to perfect that Gluten-Free recipe for sure ❤
