Rebekah Simmers
Author
Journey to Metzlingen: “Adventures in German Cooking” Part Two – Baking

I recently had an email from a reader asking about providing “Questions for Book Clubs” for my novel “The King’s Sword”, which led to a fun conversation with some writing friends. Not only did we discuss creating a series of thoughtful questions (which I’m putting together and will post soon), but my friends also recommended creating some fun things to go along with it. One fun idea was the “Adventures in German Cooking” event, which the kids and I completed over the weekend. This is the second post in that series, focusing on our (first) Baking Day 🙂
Step One: Getting Our Ingredients Organized and Menu Finalized
Our Sauerbraten marinating, on Saturday we turned out attention to the “Baking” part of our event. The plan was to make as many “Regular” (for lack of better term, just means with wheat flour) and “Gluten Free” options as we could. We knew there was going to be a learning curve here. Full disclosure – I have some friends who are truly GIFTED cooks and bakers, and I’ll pull my chair up to their table any day, but me, well, I’m not a magician in the kitchen. Like anything else though, I’ll try 🙂

Points of Note – All of our recipes began with ones featured within this German cookbook that I had purchased years ago. We used them as inspiration and then first adjusted it for our family’s needs (allergies, preferences, time, what ingredients were available . . .). Also, I am by no means a chef, so please bear with my recipes – this event was for family fun more than anything else 😉 Lastly, as our menu was Metzlingen-inspired, we were determined to put ourselves into Beatrix’s shoes as best we could and did everything by hand. I could almost hear my mom shaking her head through the phone when we were telling her this, but I laughed and said, “Well, Beatrix didn’t use a mixer, so neither will we.” 😉
Up to our ears in flour and eggs, the kids and I took another look at our menu plan. This was the original list:
- Münsterländer Buttermilchbrot (Munsterland Buttermilk Bread)
- Weizenbrot (wheat / white bread)
- Brezeln (pretzels)
- Kirschstreusel (a crumbly cherry cake)
- Schokotart (chocolate tart)
Based on time, ingredients, and that the kids asked for “lots of pretzels”, this was the reworked plan:
- Münsterländer Buttermilchbrot (Munsterland Buttermilk Bread) – regular and gluten free
- Brezeln (pretzels) and Pretzel Rolls – several batches, regular and gluten free
- Kirschstreusel (a crumbly cherry cake) – regular
- Schokotart (chocolate tart) – gluten free
I’m going to focus on the Münsterländer Buttermilchbrot, Kirschstreusel, and Schokotart in this post, and leave the Brezeln for their own post, in order to compare and contrast the various batches we made.
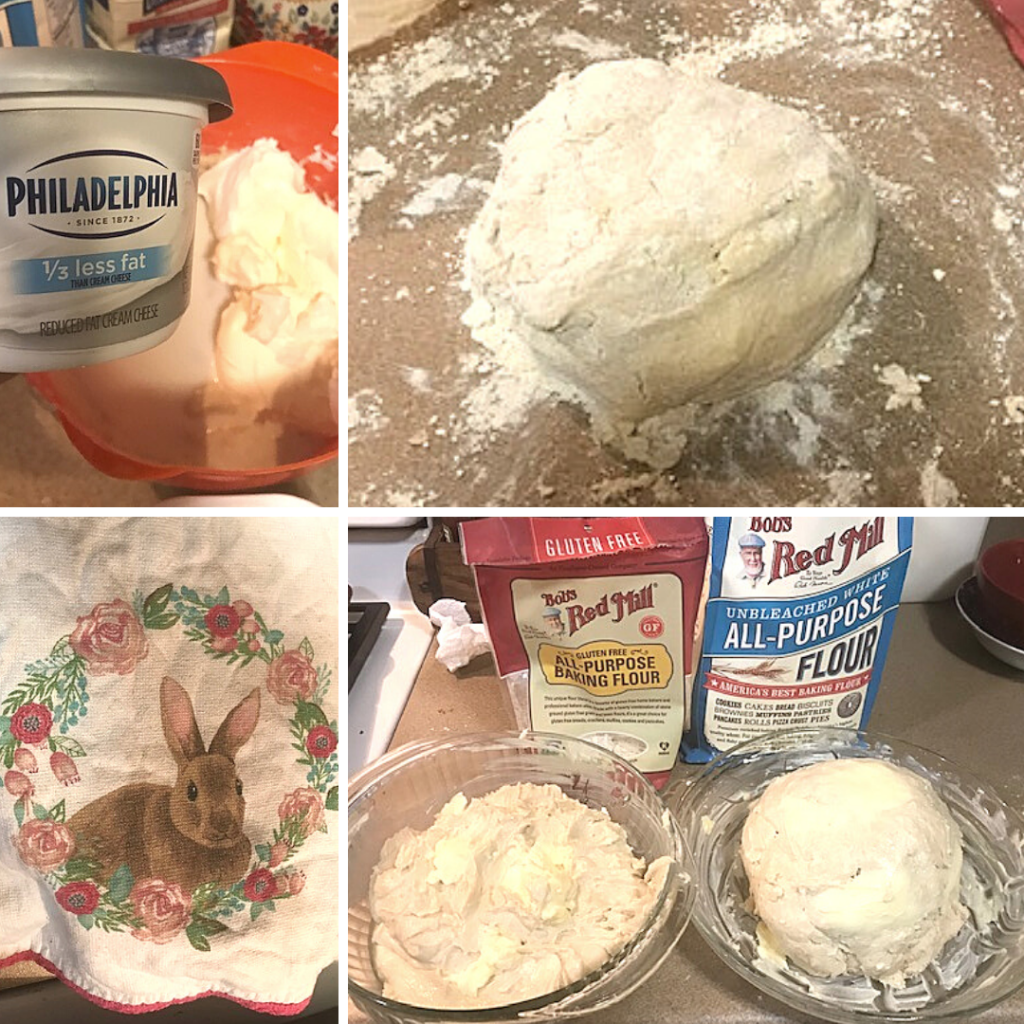
Step Two: Münsterländer Buttermilchbrot
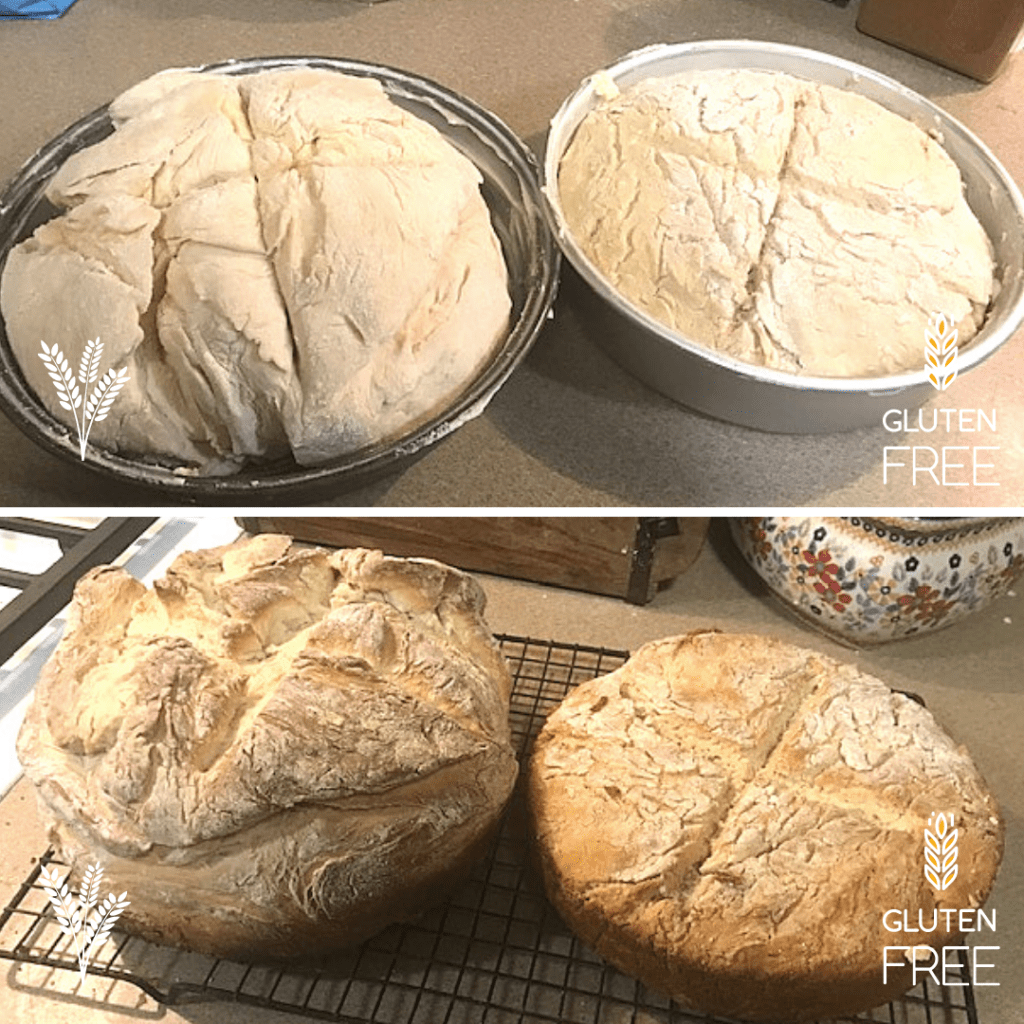
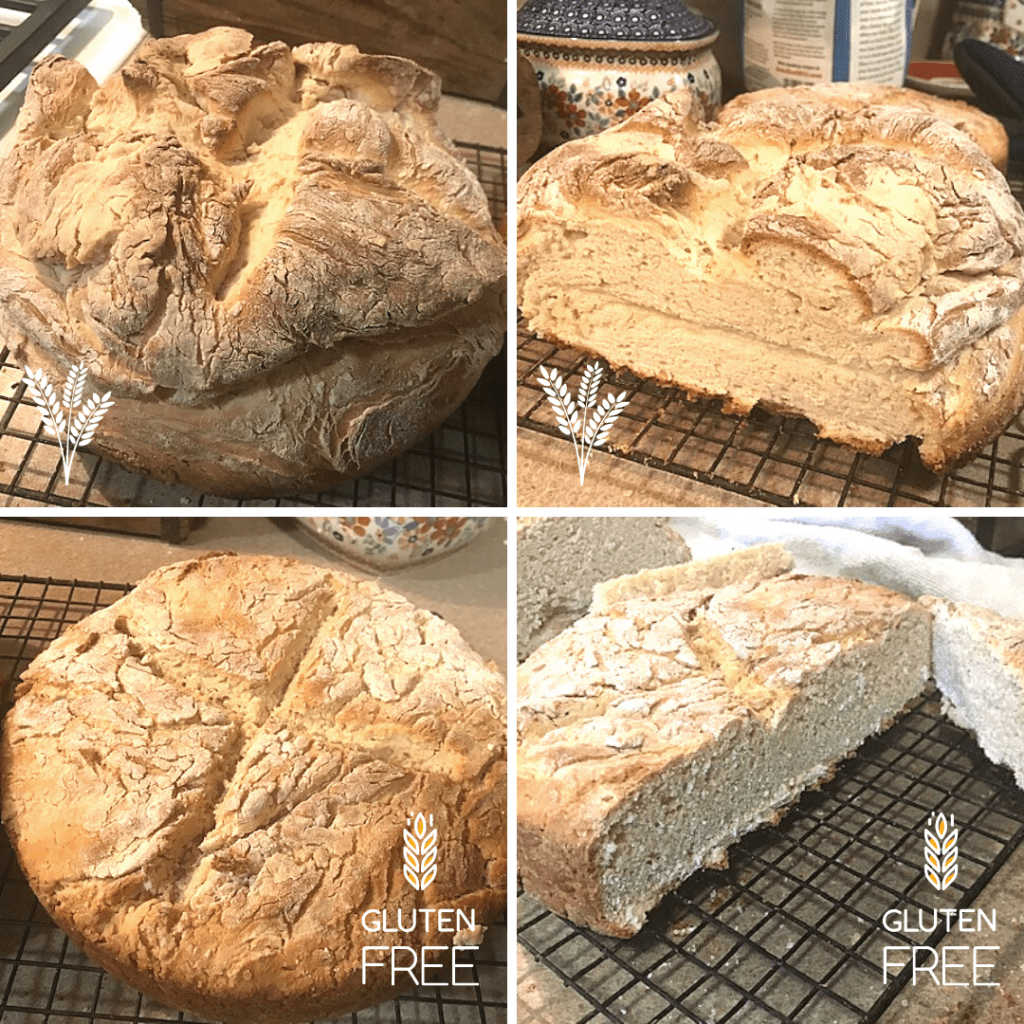
This bread turned out REALLY nice – both the Regular and the Gluten Free versions. It had a beautiful crust, really rich flavor, and worked well for sandwiches, with jelly, with Nutella (always Alex Mary’s way to judge things), and as something to dip in the Sauerbraten gravy the next day with dinner. I honestly was blown away when both of the mixes rose so nicely. I’ve made various types of gluten-free cornbread, muffins, and banana bread for years out of necessity, but this was my first shot at making homemade bread. Whole new respect for people that do this regularly! 😉
- Ingredients: 2 Packages (or 1/2 oz total) of Active Dry Yeast, 1 tablespoon sugar, 5 cups unbleached All Purpose Flour (your choice here, but remember if you are using GF flour, that you may have to add additional things like Xanthan gum. Our house favorite is Bob’s Red Mill 1 to 1 Flour mix that already has those extra things mixed in. We stayed with that brand for all of our baking, just to keep things easy. As I normally try to make everything Gluten-Free and substitute things like bananas or applesauce for sugar, this was the first time that I’d bought either regular flour or a bag of sugar in years. And I have never gone through this much butter at once lol!!!), 1 cup Buttermilk (room temperature), 1/2 pound of Light Cream Cheese (also room temperature), 2 tablespoons melted unsalted butter, and 1 1/2 teaspoons salt. Also helpful to have ready beforehand – several more sticks of softened butter, extra flour to knead dough on, at least two mixing bowls, dishtowels, and a nice space to work. Also, as we were doing one Regular and one Gluten-Free version, we had double the ingredients assembled and made each according to the following process. Remember to be consistent with the type of flour you are using and to thoroughly clean your surfaces so as not to cross contaminate if you are making both types like we did.
- Combine yeast, sugar and 1/2 cup of flour in bowl and mix. Add 1/4 cup of the buttermilk and mix in. Let mixture stand for 15 minutes.
- Add remaining buttermilk, the softened cream cheese, the melted butter, and salt, the mix until smooth. Add the remaining flour in a bit at a time and keeping mixing until smooth and thoroughly combined into a nice dough. Shape the dough into a ball and cover with softened butter. Place into a buttered bowl and cover with a clean cloth. Set aside in a nice dry and warm spot and let sit for an hour to rise.
- Once the dough has risen, sprinkle some flour onto a nice, clean surface. Place your dough here and knead hard, sprinkling in flour as needed. Continue kneading your dough, at least five minutes or until you have a very stiff dough. Once achieved, shape back into a ball, dust with flour, and place in a buttered 8-inch round layer cake pan. Cut an X across the top of your dough, cover with another cloth, and let rise like before for another 30 minutes.
- Preheat oven to 400 degrees F. Bake the bread for 35 to 40 minutes or until it has a nice brown color and your kitchen smells A-mazing (just saying). Remove to a wire rack and cool. Slice and serve.

Step Three: Kirschstreusel
This was an absolute favorite. Not too sweet. Not too difficult to make. Not too many complicated ingredients. It was easy and it was really good. It hit me last night too, that it reminded me of my Gran’s crumble recipe. Simple ingredients adding up to great taste and happy memories.
We bought a Streusel mix at the commissary to have as a back-up, but ended up using the same base recipe (exception of flours of course) for this one and for Evie’s. You can also use any type of prepared pie filling as the center. We used jars of cherries that were in the “International Section” of the commissary.
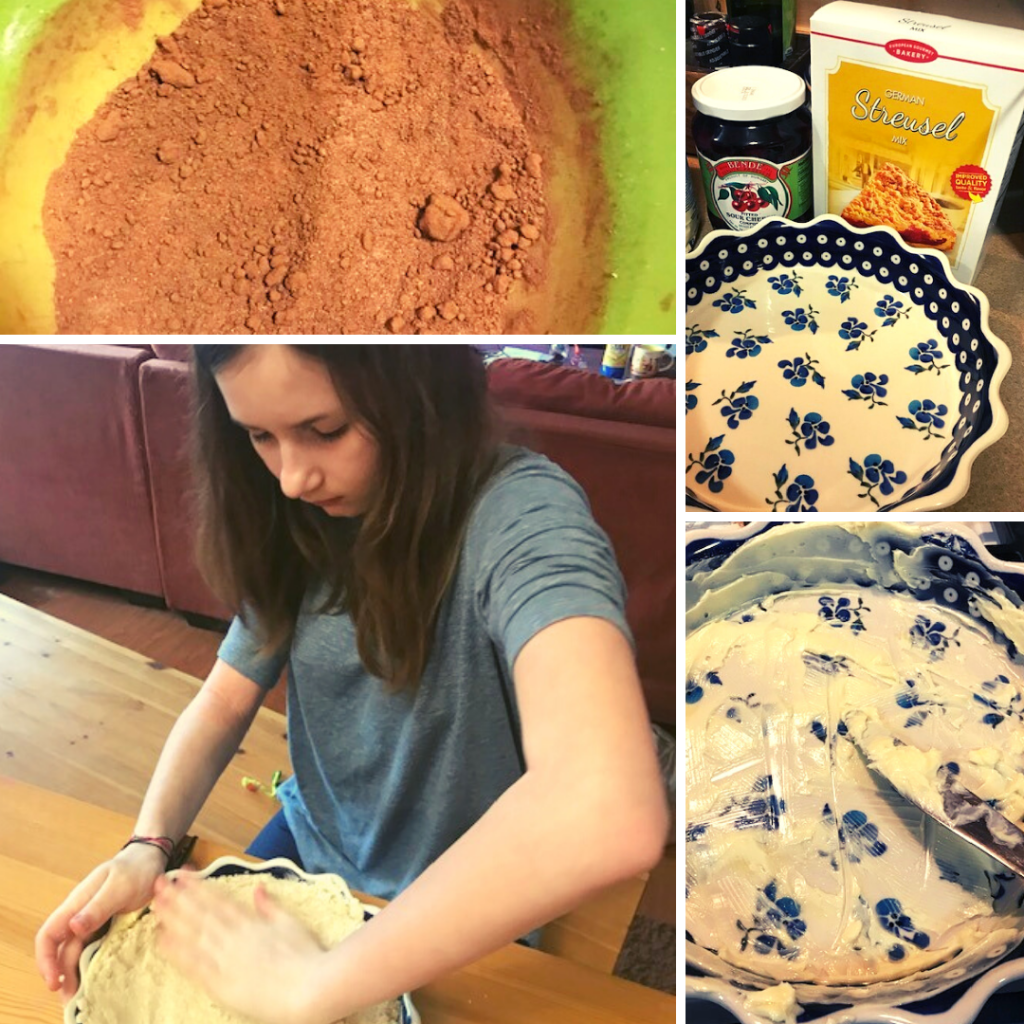
Step Four: Schokotart
This was Evie’s favorite. It was alllll she wanted to make and she devoured it over the rest of the weekend. While we used a springform pan for ours, she chose this pretty Polish Pottery pie dish for hers and it worked just fine.
Streusel / Tart Recipe:
- Ingredients: Crust – 6 tablespoons butter, 1/4 cup sugar, 2 1/4 cup flour, 1 tablespoon baking powder, 1/4 teaspoon salt, 1/3 cup cold milk, one large egg, and another splash of milk. Also have extra softened butter to prepare pan.
- Preheat oven to 350 degrees F. Generously butter your pan of choice and set aside.
- Cream 6 tablespoons of softened / cold unsalted butter. Add 1/4 cup sugar, but only a bit at a time, folding into the fluffed butter until you have it all mixed.
- Add 2 1/4 flour, 1 tablespoon baking powder, and 1/4 teaspoon salt and then 1/3 cup cold milk, mixing just enough so you’re combining everything. The mix is going to be rather crumbly.
- Press approximately 2/3 of your mixture into the bottom on your choice of pan and up the sides a bit as well, to prepare a place for your fruit. Brush with an egg glaze (one yolk mixed with a splash of milk).

- Ingredients: Filling – Prepared filling of choice or one jar pitted cherries, cup of water, lemon juice, one cup sugar, and 4 tablespoons of cornstarch.
- If using a prepared pie filling, simply add on top of your crust and spread just enough so that you can have a crust around the outer rim. For ours, we drained the jar of pitted cherries and put them in a saucepan with a cup of water, a healthy splash of lemon juice, a cup of sugar, and 4 tablespoons of cornstarch. After bringing to a boil, we let it cook on low about ten minutes, stirring frequently. Once this was cool, we added it to our cake pans.
- For the regular one – We spread the rest of the crust mixture so that it creates an outer crust and then sprinkle across the fruit. For Evie’s, she wanted a chocolate crust, so she also added (without measuring, totally let her run with this) cocoa powder, more sugar, a splash of vanilla extract, and cinnamon. After mixing that up, she added that over top of her “streusel / cake / tart” creation. Again, she LOVED her tart, but in retrospect, I would’ve encouraged her to measure and possibly incorporate the chocolate from the very beginning? Not sure and it’s something we will try again. I was more worried about her base not working, but really, my girl was happy, so we were happy 😉
- Bake in the lower third of the oven for 45 minutes or the top starts to get that lovely golden brown. Cool before serving.
Hope you’ve enjoyed the second part of our “Adventures in German Cooking” series. This was SUCH a fun day for us and a great learning experience for the kids. Now to get the next part of the Sauerbraten cooking and the Pretzel post written up for you!

